Git/GitHub basics
2022-07-28
Git/GitHub are extremely useful tools that every developer should be familiar with. In this post I highlight some of the main features and how to use them.
What is Git?
Git is an open-source version control software widely used in software development to collaborate and track changes to a set of files. The latest version of Git can be downloaded here.
What is GitHub?
GitHub is a web service that allows you to store a remote repository (a set of files) on their servers. This means that after you make changes to files on your local machine, you can then “push” those changes to the remote repository on GitHub. This allows you and others to access these changes on separate computers and collaborate on your repository.
Definitions
Repository - A GitHub repository/repo is a set of files and folders that make up your project. These files are typically required to build and contribute to your project on another computer. A repo will usually contain a README markdown file that describes the project clearly.
Branch - A branch is a way to work with a different version of your repo whilst keeping an existing version active. The default branch is called the master/main branch. Creating a new branch from the main branch will result in a copy of the main branch. Changes to the new branch will not be reflected in the main branch until a merge has occurred.
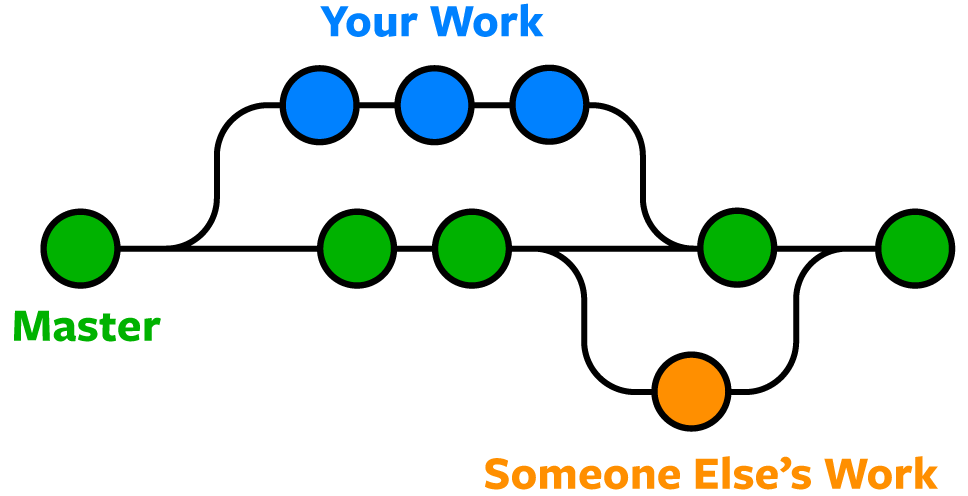
This image illustrates how multiple people can collaborate on the same project by using separate branches. Each circle is a commit. Lines moving from master outwards are branches, and lines moving towards master are merges.
Commits - Every change to your repo is called a commit. Each commit has a small description of the changes made.
Pull Requests - Pull requests are made to pull the changes made in one branch into another. This means that someone working on a branch can create a PR (pull request) to merge into the main branch whilst another person working on a separate branch continues to work until they create a PR. If a PR has no conflicts, the PR can be merged.
Using Git and GitHub
Basic setup
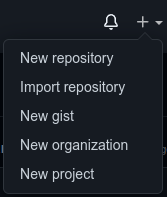
Install Git and make a GitHub account. Create a new repo on GitHub by clicking on the plus dropdown at the top right.
Cloning
To download/clone the repo to your computer, click on the green code button and copy the HTTPS link to your repo. Now in the terminal of your choice or the git bash terminal, enter:
$ git clone <insert your HTTPS repo link here>
Committing
As mentioned earlier, git keeps track of changes made to your repo when you make commits to your repo. To make a commit you must first add the files that you have changed. You can view the changes made to the repo by using:
$ git status
After identifying the files you want to commit, use:
$ git add <name of file>
If you need to add multiple files, you can simply name those files one after the other like:
$ git add <name of file 1> <name of file 2> <etc>
If you simply want to commit all changes, you can use:
$ git add .
Now that your files have been added, you can commit our changes using (make sure to include the quotation marks):
$ git commit -m “<insert description of changes made here>"
Pushing to GitHub
Now that you have made your first commit, you can upload our changes to GitHub by making use of the git push command:
$ git push
At this point, you can navigate to your GitHub repository to see the changes you have made alongside the commit and its description.
Branching
Although the above method of pushing to the main branch works fine when you are the only person working on a repo, doing the same with a team will quickly become problematic. This is where branching comes in handy.
Before branching from any existing branch, you must ensure that our local repo has the latest changes downloaded. You can do this with:
$ git fetch
To create a new branch, you can now use:
$ git checkout -b <insert name of new branch>
Now that our new branch has been created and you have checked out to said branch, you can begin making changes. Once you have committed these new changes and are ready to push to GitHub use:
$ git push origin <insert name of branch>
At this point, if you navigate to your repo on GitHub, you should see a dropdown displaying the various active branches. Selecting your new branch will display your recent commit whilst the main branch will not.

Creating a PR
You should also see a “compare & pull request” button in the top area of the screen. Clicking this button will allow you to enter a PR name and description. You can also change which branch you want to merge into, and assign people to review the PR.
Reviewing a PR
As a reviewer, your job is to ensure that the feature implemented in the PR works as intended and that the code is optimised and tidy. First, fetch the remote repo using:
$ git fetch
Then checkout to the desired branch using:
$ git checkout <insert branch name>
Now that you have the branch you want to review on your local system, you can test the implementation of your team member’s code. Once you have reviewed the code, you can either request changes or approve the PR.
Merging
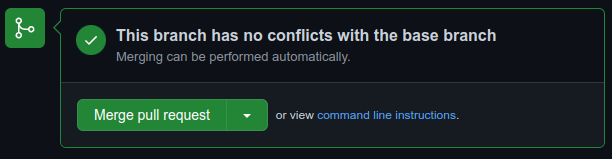
Ideally, you would want to have your PR approved by at least two people, but If your PR has no conflicts, you have the option of merging via GitHub by clicking on the green merge button. After merging, you can also delete the remote branch if you do not plan on using it again.
Deleting local branches
Once you have finished reviewing or have merged your changes, you can delete your local branch. First switch back to the main branch using:
$ git checkout main
Then delete the now merged feature branch:
$ git branch -D <name of merged branch>
Thats the general gist of Git/GitHub. There are more commands and features, but this post covers the most common commands.